I recently acquired a PC-9801RA2 and have been gradually upgrading it with new C-Bus cards, external drives, CPU accelerators, and anything else I can find to make it as flexible a package as I possible can. In a perfect world, perhaps I’d even be able to avoid buying a PC-9821 for later games of the era, but I’m not sure how far I can push with CPU and memory upgrades.
One key part of this involves adding an internal HDD to run my OS of choice (MS-DOS 6.2) and host all the dumps I make of games. While the RA series comes with a slot for an internal drive (and the RA5/51 both come with a drive included), on the RA2/RA5 this is largely limited by hardware to 40MB SASI drives—barely enough for the MS-DOS 6.2 installation by itself!
Since SCSI C-Bus boards are pretty easy to come by and perhaps there could be some way to integrate with a card that fits in the pre-existing internal drive slot, I chose to give BlueSCSI a shot!
An intro to BlueSCSI
BlueSCSI is basically an open source and open hardware solution that can be used to replace hard drives in vintage computers with an SD card containing a number of emulated drive images, as long as there’s an SCSI interface to plug into. Of all the solutions I’ve been able to find for replacing SCSI hard drives with another form of storage, it seems to be one of the more configurable and transparent options. There are also many different suppliers from which pre-made boards or kits can be purchased, and there are even instructions on how to build one entirely from scratch yourself.
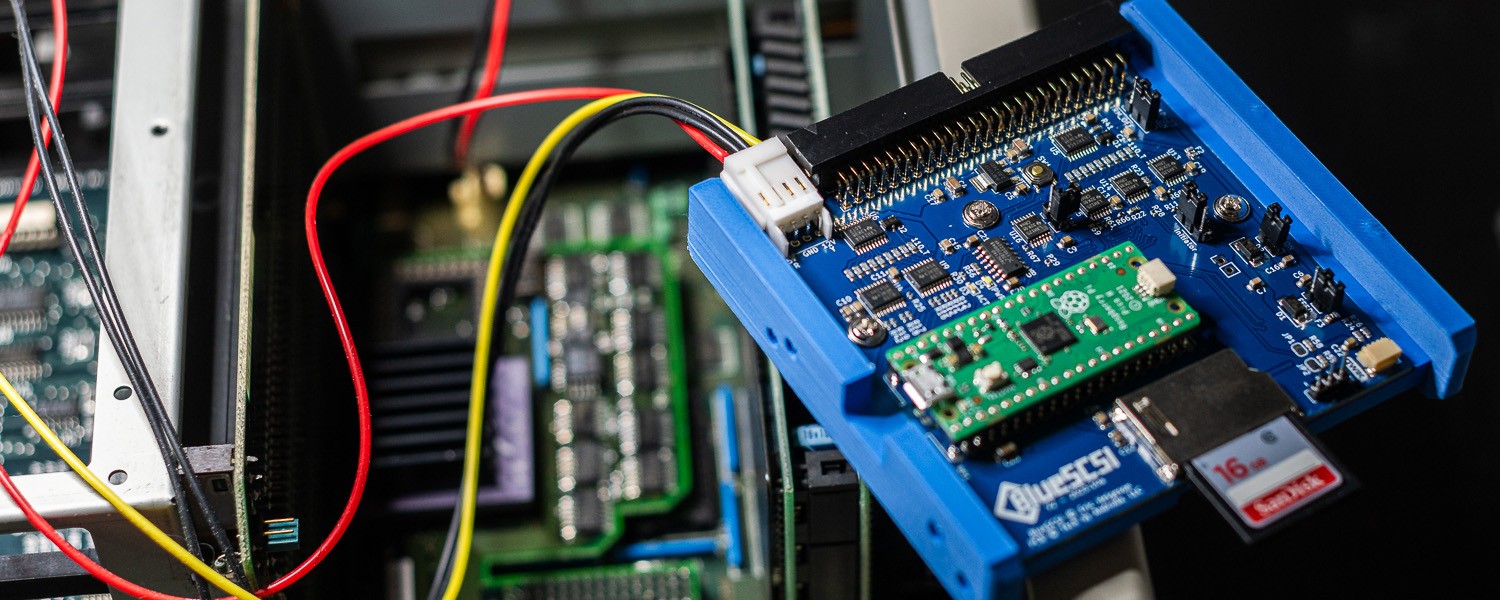
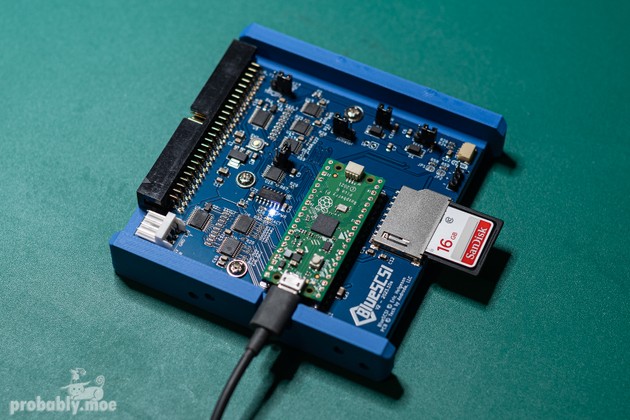
For my explorations, I chose to go with the 50-pin v2 Desktop version (revision 2023_10a), purchased fully assembled and with its own tray, since this would allow me to easily connect to another internal SCSI connector using a standard 50-pin SCSI cable. I have, however, also seen the PowerBook version used successfully, soldered directly to certain C-Bus SCSI cards as well.
The RA internal HDD
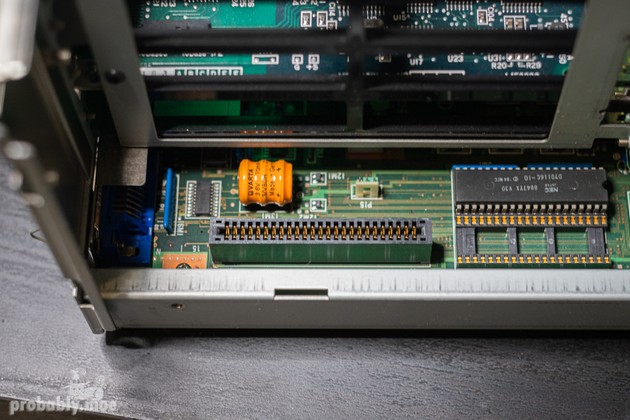
My first thought was that I could take advantage of the existing interface for the internal SASI drive used by the RA series—after all, SCSI is an evolution of the SASI standard and there’s a fair degree of compatibility between them. Unfortunately, NEC’s first-party drives—the PC-9801RA-34 and PC-9801RA-35—don’t use the typical SCSI-compatible internal connector, but rather a SASI-ST-506 connector made up of two separate connectors with different pin counts. The RA21 and RA51, however, support SCSI drives natively through a second slot on the board, but this is sadly absent from the older RA2/RA5 models.
There are certain third-party equivalents that actually use the standard internal SCSI connector and are compatible with the RA2/RA5, such as the Techno Japan TR41, but it seems other Japanese users have tried this in the past and found that it doesn’t actually work—the BlueSCSI drives simply aren’t recognised. It would be nice to try this out first-hand just to see what information I might find through debugging, but sadly I’ve been outbid on the last couple of TR41s that showed up on Yahoo Japan.
Much more detailed information on these aspects can be found in Japanese here1.
SCSI C-Bus boards
I had to go through two different boards while trying to get this to work. It was important to me that the board I pick have an internal SCSI connector, not just an external one, so that the integration would be completely internal. There are surprisingly few of these out there, though it’s apparently also possible to solder an internal connector to some SCSI boards that don’t already feature them.
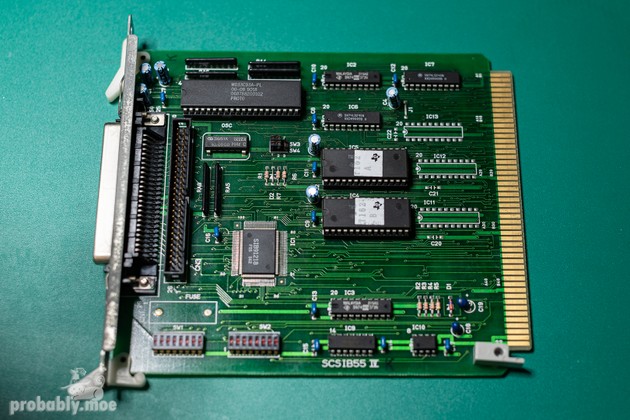
The first of these boards was a Techno Japan SCSIB55 Ⅳ (pictured below). Finding the DIP switch settings2 for this was something of a challenge, and none of the combinations I tried worked3; I was perpetually stuck at the ‘SCSI BIOS Initializing…’ screen. Though I haven’t confirmed it, I suspect that the EPROMs may have corrupted with time, leaving me with a dead board.
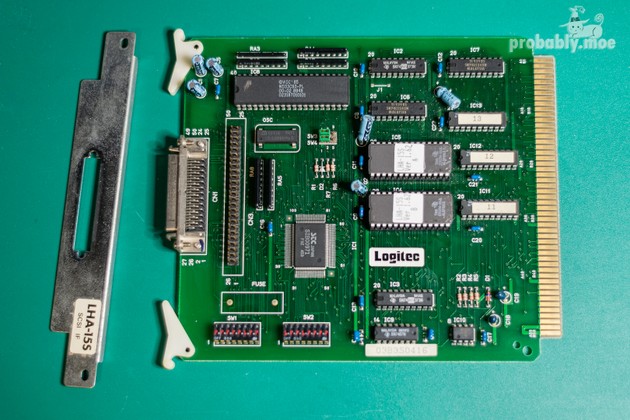
Having given up completely on that board4, I instead picked up a Logitec5 LHA-15S. Some of these also feature an internal SCSI connector, though in my case without the connector housing—something that will prove to be a bit of a Chekhov’s Gun in this case. It’s important to note that not all LHA-15S have the internal connector attached so make sure to check before picking one up! The DIP switch settings6 for this took some work to find again, and are apparently mostly shared7 with the LHA-15U.
I used the default DIP switch settings, but set the interrupt to INT3 to avoid conflicts with some of my other cards, and because this is commonly used8 for SCSI interface cards.
Simply installing this card (in the top slot so I could pass the SCSI cables out of the C-Bus cage) with these settings was enough to have it initialise correctly and be usable by the system.
Setting up the SD card and drive image
With a working interface to which a BlueSCSI could feasibly be connected, it was time to set up the drive I would be using. Following the instructions in the BlueSCSI docs, I used the SD Card Formatter to format an old 16GB memory card I had lying around. I stuck with FAT32 rather than exFAT simply because I won’t be using drive images large enough for it to matter.
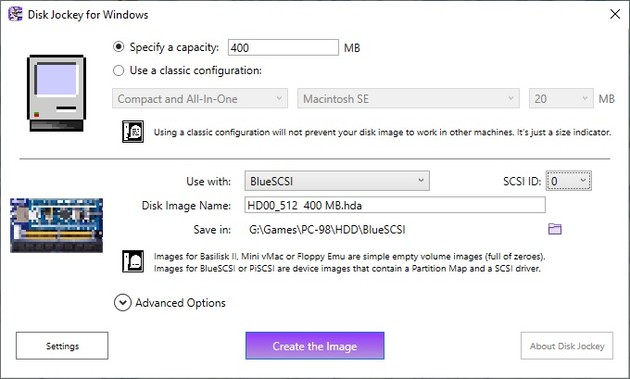
I then used Disk Jockey to create a 400MB disk image9. The settings I used are pictured below.
Configuration
There’s some small amount of info on the PC-98 in the compatibility section of the BlueSCSI docs, but it’s not very comprehensive and I suspect that the SectorsPerTrack and HeadsPerCylinder are the wrong way around, in addition to only being representative of 92 series SCSI cards, which use a sector count of 32.
My LHA-15S, however, is a 55 series card10 and not all 55 series cards will accept values other than 25 for sector count. The configuration I used is as follows:
[SCSI]
System="Generic"
Quirks=0
EnableSCSI2=0
MaxSyncSpeed=0
SectorsPerTrack=25
HeadsPerCylinder=8
Vendor = "NEC"
Product = "D3861"
This is simply saved into a bluescsi.ini file and placed next to the drive images in the root of the SD card. The configuration itself is one I obtained from Project M.P.S11, which also goes into a lot more detail on the reasoning behind some of the individual settings and has more information regarding 92 series compatible SCSI cards.
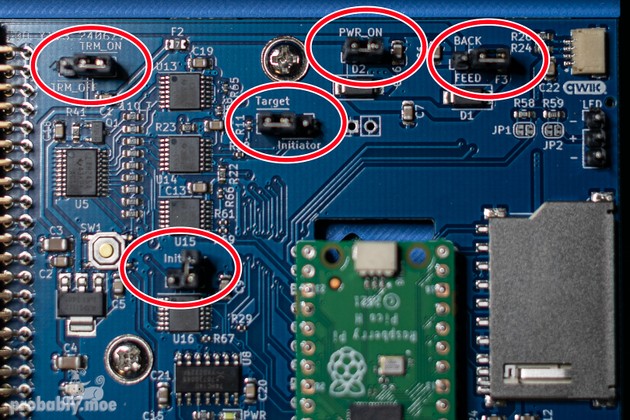
In terms of the jumper settings on the BlueSCSI board itself, I mostly left everything default, so with the following jumpers set and the remainder left unset:
- TRM_ON
- PWR_ON
- Target
Getting power
With the drive images prepared and the SD card set up, we’re almost ready to install everything and get it up and running. Unfortunately, a connection from a C-Bus SCSI board alone isn’t enough to power the BlueSCSI, so we have to draw our power from somewhere else. As luck would have it, the RA series machines12 were built to house an internal HDD and have a power connector already available. Only…it’s a little non-standard.
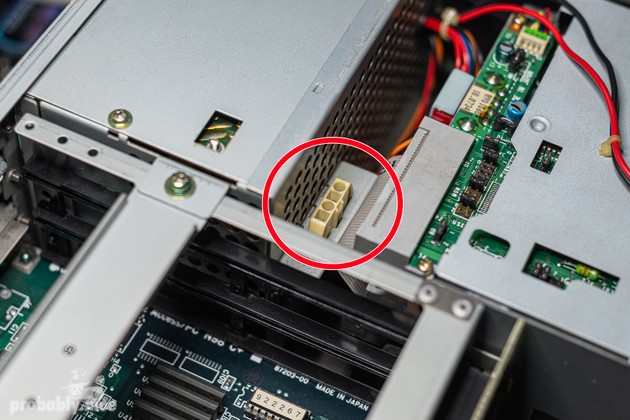
The desktop BlueSCSI, on the other hand, takes a classic Berg floppy drive power connector.
As luck would have it, I managed to track down pin assignments13 and details on compatible connectors for the RA side of the connection, and it shares the same configuration as the floppy drive power connector. This meant that with the correct parts, I could put together a custom cable to supply power to the BlueSCSI without needing to fall back to introducing USB power or some other less elegant solution.
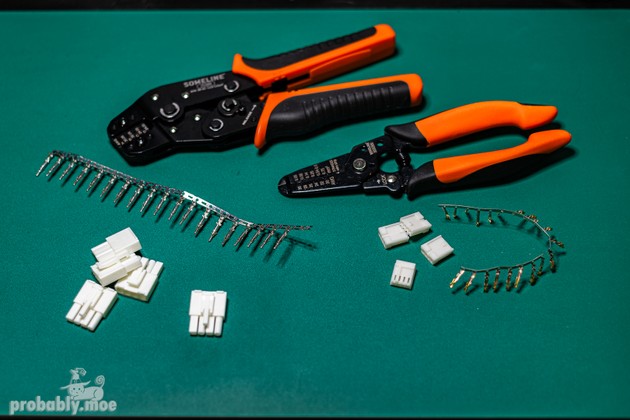
The specific parts required for the cable were:
- AMP - TE CONNECTIVITY 171822-4 (the floppy drive power connector).
- AMP - TE CONNECTIVITY 170262-4 (contacts for the floppy drive power connector).
- JST ELP-04V(P) (the connector housing on the RA side).
- JST SLM-01T-P1.3E (contacts for the RA-side connector).
- Wire with AWG between 20 and 26 (I used 22 because I had it on hand).
Suitable crimping tools were necessary to attach the contacts as well, of course, and a good pair of wire strippers.
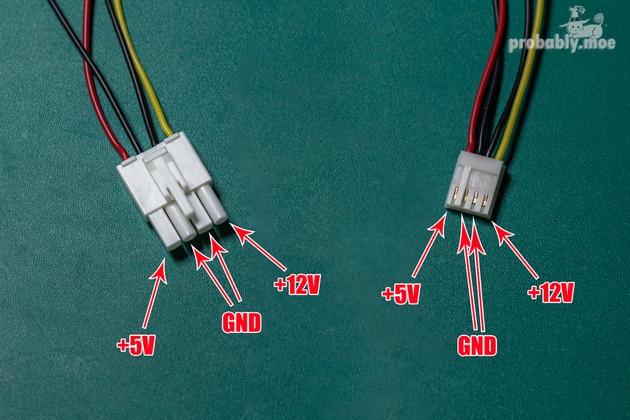
Pin numbers are given from left to right, with the ELP-04V(P) viewed with the square plug to the left, and the floppy drive connector viewed with wings down and contacts up. The assigned values and colours are:
- Pin 1 — +5V — Red.
- Pin 2 — GND — Black.
- Pin 3 — GND — Black.
- Pin 4 — +12V — Yellow.
The original cable for the RA drives has +12 as orange instead of yellow, but for all intents and purposes, this is a pretty trivial mapping.
Installation
Once everything is prepared, installation is pretty simple.
I first plugged the BlueSCSI into the power socket on the RA and turned it on, just to confirm that it was receiving power and that the drive images and configuration on the SD card were set up correctly. The PWR light came on and there was a single blink of the light on the Raspi board, indicating that everything was functioning as it should be. In the event that this wasn’t the case, there’s comprehensive troubleshooting documentation in the BlueSCSI docs, and it’s pretty easy to take the SD card out and read the log files from it for more information.
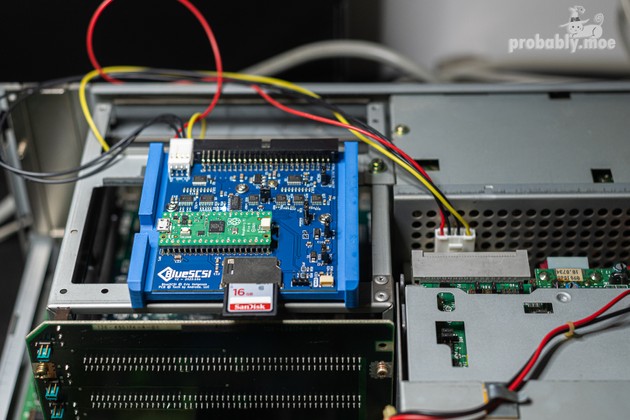
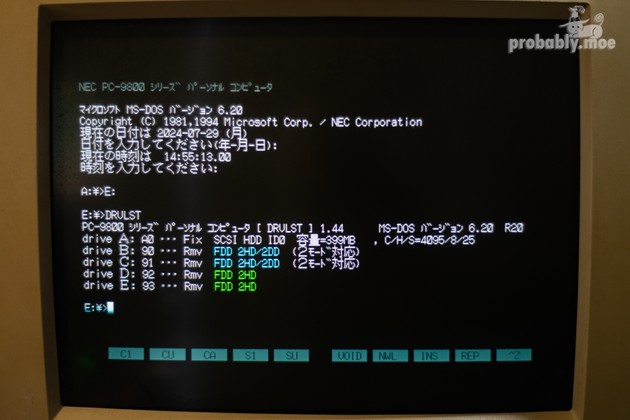
After this, I connected the BlueSCSI to the LHA-15S using a standard internal SCSI cable14, taped it precariously to the side of the C-Bus cage with some Kapton tape, and booted up the system. I used FORMAT from my floppy disk installation of MS-DOS 6.2 to confirm that the HDD existed and formatted it as a boot drive, before using drvlst15 to confirm the head and sector counts were correct (H/S). I could also see that the size was being correctly reported as well!
Disk activity light and future challenges
The final result functions exactly as I’d hoped, but there are a couple of aspects I’d still like to clean up a bit.
Firstly, I’d like to hook up the disk activity light on the front of the machine to the LED headers provided by the BlueSCSI. There’s a specific connection on the RA board for both the power and disk activity lights which uses a three-way Berg connector to provide GND and LED power to the two separate LEDs. I could potentially create another custom cable that attaches here and only takes the GND and power LED from the main board, with the activity LED then pulled from the BlueSCSI board instead. There could, however, be a more elegant solution that also solves the second part that needs some attention:
This is not the neatest solution for mounting the BlueSCSI!
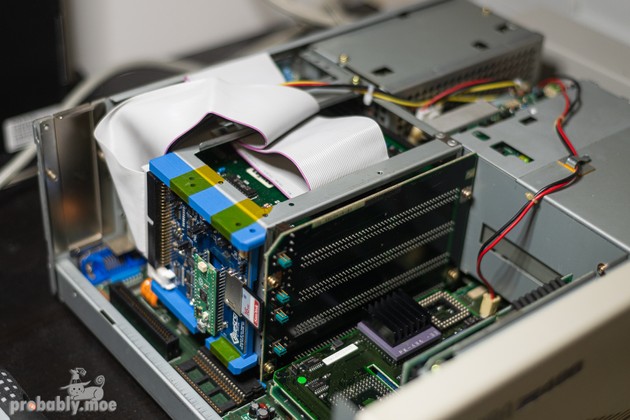
In the past, Project M.P.S offered a custom board16 for mounting a RaSCSI or Henkan Bancho in the internal HDD slot which would also connect to the activity LED. Unfortunately these seem to be discontinued and are more or less impossible to find, but it does provide some more clues to a better solution.
I have a PC-9801RA-35 I won at auction on Yahoo Japan on the way with a working 40MB SASI drive attached. My plan is to remove the drive17 and use the bracket for mounting the BlueSCSI in a much more robust manner. Of course, the board the drive attaches to is also meant to handle sending the LED signals for the disk activity light, and thanks once again to Project M.P.S, we have details of the pinouts18 for the RA board’s internal HDD SASI connector. My hope is to use this to find an appropriate place to hook in on the PC-9801RA-35’s board and solve the activity light that way.
But until that arrives, there’s nothing more to be done except boot up some PC-98 games that require HDD installation and get to dumping as many of my other games as I can!
-
Archived: https://web.archive.org/web/20240730115601/http://98epjunk.shakunage.net/storage/hdd_kanagu.html
↩ -
Archived: https://web.archive.org/web/20240519024137/http://ematei.s602.xrea.com/miyabi/data/b55iv.txt
↩ -
I eventually tried every single possible combination out of sheer frustration…
↩ -
Though I’m confident it would have worked had it not been dead!
↩ -
Not to be confused with Logitech!
↩ -
Archived: https://web.archive.org/web/20170507021436/http://ozuma.o.oo7.jp/parts/lha-15u.htm
↩ -
Archived: https://web.archive.org/web/20170507021416/http://ozuma.o.oo7.jp/parts/lha-15s/index.htm
↩ - ↩
-
The size was relatively arbitrary—large enough that I won’t need to worry much about space, but small enough not to hit my RA’s BIOS limitations.
↩ - ↩
-
Archived: https://web.archive.org/web/20240731162453/https://projectmps.net/ardscsino_bluescsi.htm
↩ -
As well as many others!
↩ -
Archived: https://web.archive.org/web/20240731163636/https://shiuntenlos.ie-yasu.com/eema0028.htm
↩ -
And spent some time debugging until I figured out it was the wrong way around on the board…
↩ -
Archived: https://web.archive.org/web/20240720134627/http://hp.vector.co.jp/authors/VA012947/util/drvlst.html
↩ -
Archived: https://web.archive.org/web/20240801092346/https://projectmps.net/pmdoce98rd.htm
↩ -
And store it away safely!
↩ -
Archived: https://web.archive.org/web/20240801092819/https://projectmps.net/pmdoce98tech.htm
↩
